Licence Server Manual
for administrators
1. What is an administrator?
A school or therapist can take out a subscription for several licences for one of our products. The person who is responsible for distributing the licences to users is referred to as the administrator.
The collection of licences possessed by the administrator is referred to as a site. The administrator also has the ability to create subsites, for example, a subsite for each class in a school or a subsite for each school in a school group. This may be useful for organisations that possess a large number of licences.
Below, you can read how you can create an administrator and how the administrator can create or deactivate subsites and users.
2. Create an administrator using the serial number
As an organisation, you will receive an email from Sensotec to confirm that your subscription has been created. In the email, you will receive an overview of the data relating to this subscription, including the serial number, which can be used to create an administrator.
- Go to the licence server (https://lic.sensotec.be) and click on the Aanmaken (Create) button to create a new administrator.
- From the menu at the top, select Serienummer (Serial number) and fill in the serial number you have received.
- Click on the Volgende (Next) button and fill in the other fields. Fields with an asterisk (*) are mandatory.
- Accept the privacy regulations and click on the Account aanmaken (Create account) button. A notification will appear stating that a confirmation email has been sent to your email address for verification purposes. Click OK (OK).
- Click on the link in the confirmation email to verify your email address.
From now on, you can sign into the licence server with the username and the password you have just created. See chapter 3. Signing in as an administrator.
3. Signing in as an administrator
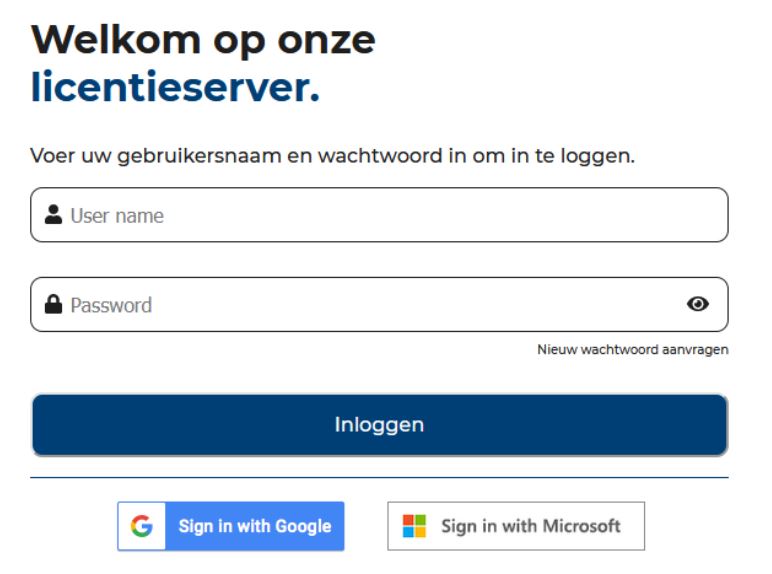
Go to the licence server (https://lic.sensotec.be), fill in your username and password and click on the Inloggen (Sign in) button.
 It is also possible to use Single sign-on (SSO) to sign into the licence server. To use this method, you must first sign in with the username and password of the licence server. Then click on one of the SSO links at the bottom of your profile to choose which one you wish to use to sign in from now on:
 If you are already signed into this server (e.g. your Google account) then the connection is created immediately. If you are not signed in, you will first be prompted to enter your username and password. The icon will then appear brighter.
The next time you sign into the licence server, you can click on Sign in with Google or Sign in with Microsoft, depending on the SSO link you have created.
If you want to delete this connection, click on the cross that appears when you hover your cursor over the icon.
4. Once you have signed in
Overview
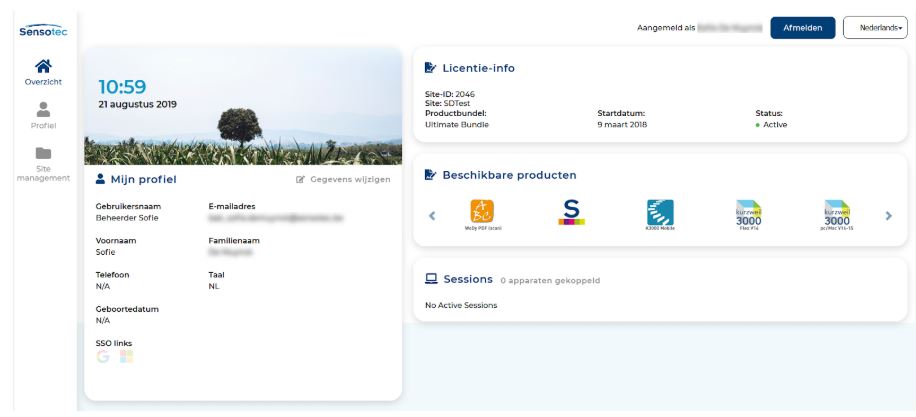
After signing in, you will immediately be shown an overview. Here, you will see info about your profile, the licence info, the available products and the number of sessions, if you are a user of the product.
In the example below, you have the Ultimate Bundle. This bundle contains all the products that work with the licence server.
If you click on Gegevens wijzigen (Edit details) then you are redirected to the Profiel (Profile) section.
Profile
In this section, you can change your profile details and your password.
Site management
The data for the site for which the administrator was created is displayed here.
Structure
On the left-hand side, you can see the structure of the site. You also have the option to create subsites, for example a subsite for each class in a school or a subsite for each school in a school group. This may be useful for organisations that possess a large number of licences. See chapter 5. Using subsites.
Site informatie
Here, you can see the maximum number of users that can be added to the (sub)site that you selected in the Structuur (Structure) section and how many users have already been created. In the example below, you can see that a maximum of twenty users can be added to the site and that four users have already been created. In the Structuur (Structure) section, this is shown as numbers in brackets: 4/20.
User management
Here you will see a list of users in the (sub)site you have selected in the Structuur (Structure) section. If desired, turn on the Toon de gebruikers van alle (sub)sites (Show users for all (sub)sites) switch. You will then not only see the users in the (sub)site you have selected in the Structuur (Structure) section, but also users from all of the child subsites.
In the lower right corner, you can navigate through the list of users.

Editing users
Click on the pencil to edit the users’ details and change their passwords, if necessary.
Activate/deactivate users
You can deactivate a user by turning off the Actief (Active) button next to the user. The user will remain in the database but will no longer have access to the licence server. The administrator can reactivate the user at any time.
Removing users
Click on the Prullenbakje (Trash can) if you want to permanently delete a user from the database. The administrator will not be able to reactivate this user.
If the user is using an application that saves settings on the licence server, these settings will be permanently deleted.
If a user is deleted, their username can then be reused. This means the username can be chosen again when creating a new user.
Creating users
Click on the button with three dots to add one or more users to a (sub)site. If you choose to add a single user, fill in all the mandatory fields. It is also possible to add, delete and/or edit multiple users using an Excel file.
You can also enable users to create their own user accounts. In this case, you must provide the user with a registration code, which they can use to create a username and password. See chapter 5 Using subsites for more info about registration codes.
The file that you upload must be an Excel file containing several columns. For each row, you must indicate in the first column whether you wish to add, delete or edit the user by inserting a plus sign (+), a minus sign (-) or an asterisk (*). In the next columns, you must enter data relating to the user (e.g. Username, Name etc.). The Excel file must be formatted in a specific way to ensure that the data can be correctly processed. You can download a template that meets all the requirements by clicking on the link Sjabloon downloaden (Download template).
Once you have filled in the Excel file, you can select the file via the Bestand kiezen (Select file) button and upload the file by clicking on the Bestand uploaden (Upload file) button.
A report will be sent to the administrator. In the report, the administrator can see how many users were added, deleted and edited. They will also receive an overview of any errors that occurred.
Note: An administrator of a subsite can only make changes to their subsite and any child subsites.
5. Using subsites
It may be useful for organisations with a large number of licences to create subsites. For example, you can create a subsite for each class in a school or a subsite for each school in a school group.
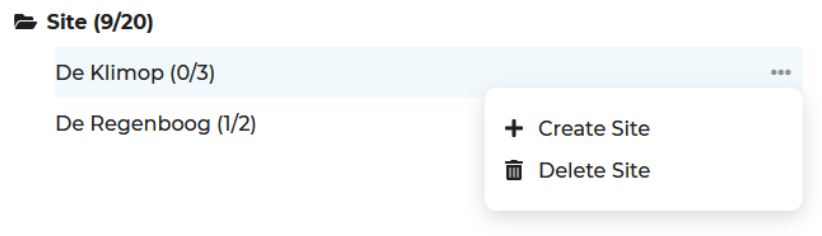
In the example below, two subsites have already been created (read how to do this below): De Regenboog (The Rainbow) and De Klimop (The Ivy). You can see that no users have been created in the main site, but five are reserved for the subsites. In the overview on the left-hand side, this is shown as numbers in brackets: 5/20. Two users can be added to De Regenboog subsite and three to De Klimop.
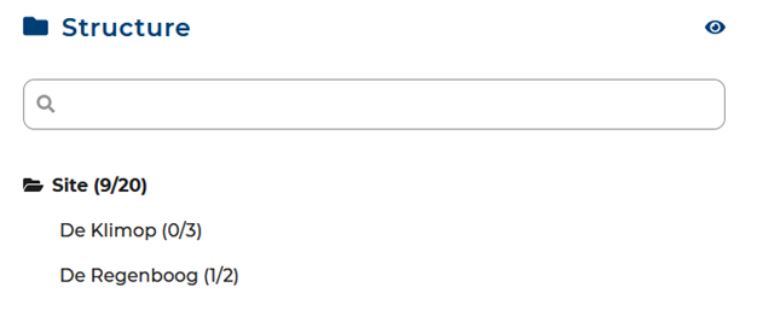
If you select De Regenboog (The Rainbow) subsite in the overview on the left-hand side, more info about this subsite will appear on the right-hand side. The maximum number of users that can be added to this subsite is two and one user has already been created. In the overview on the left-hand side, this is shown as numbers in brackets: 1/2.
If you select De Klimop (The Ivy) subsite in the overview on the left-hand side, more info about this subsite will appear on the right-hand side. The maximum number of users that can be added to this subsite is three and zero users have been created. In the overview on the left-hand side, this is shown as numbers in brackets: 0/3.
It is possible to search for a (sub)site using the search field:
You can create or delete subsites using the button with three dots:
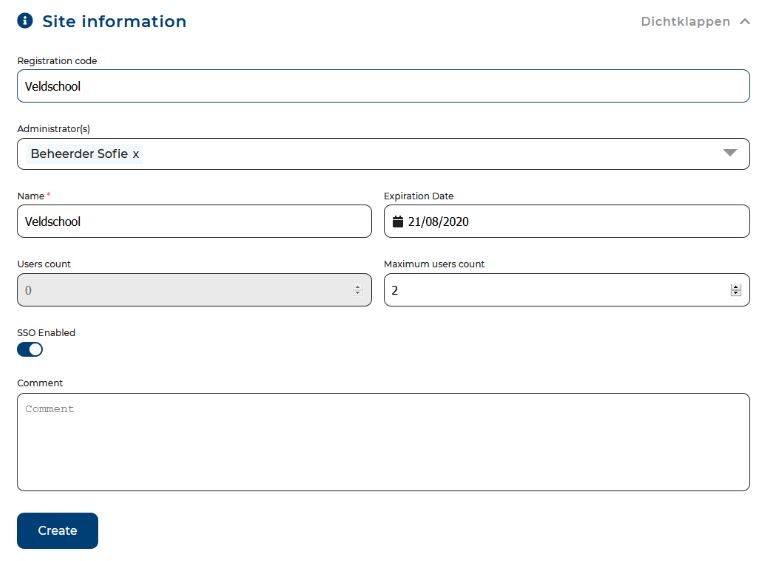
Click on the Subsite aanmaken (Create subsite) button to create a subsite. On the right-hand side of the screen, you can enter Site information for the new subsite.
Each subsite can be given a registration code and an expiration date. These can differ from the registration code and expiration date of all the parent sites.
What is the registratiecode (registration code) used for? It is used to allow users to create their own accounts in a simple way. In the case of the Veldschool (Field School), you could create the registration code “veldschool” (“fieldschool”). You can then share the registration code with users. With the registration code, users can create their own accounts. Consult the user manual to read how they can go about this. The registration code must be unique. The user can use the registration code until you change or delete the code, or until the site expires.
By default, a new subsite does not have a beheerder (administrator). The subsite is managed by the administrator of the parent (sub)site (e.g. the general director of the school group). You can also choose to assign a subsite to another administrator (e.g. the headmaster of the Veldschool (Field School)) or add several administrators. You can assign users the role of administrator by clicking on the pencil icon next to the user in the Gebruikersbeheer (User management) section. Tick the desired roles in the window that appears. Please note, the administrator of a subsite can only see information relating to that particular subsite.
The vervaldatum (expiration date) of a site is the date on which all users of the (sub)site expire, except the users that have a separate expiration date. Click on a user in the Gebruikersbeheer (User management) section to provide an expiration date for an individual user. Expired users can no longer sign in but remain in the database.
Click on the Aanmaken (Create) button to create a subsite. You can see in the overview on the left-hand side that the Veldschool (Field School) has been added.
6. Change display language
In the upper right corner, you will find a menu for changing the display language. You can choose between the following languages: Dutch, French and English.
7. Signing out
You can sign out at any time by clicking on the Afmelden (Sign out) link in the top right corner.
Copyright © 2019 – Sensotec NV
Contact details : Sensotec nv – Vlamingveld 8 – B 8490 Jabbeke
info@sensotec.be – www.sensotec.be